Creating Amazon Product Images with PixPix: From Real-World Sample Photos to 7 Listing Visual Assets

A compelling set of Amazon product images isn’t just about snapping a white‑background shot and adding a few attractive scene photos. Its purpose is more specific: helping shoppers clearly visualize the product on the search page, addressing questions about size, material, and usage on the detail page, and ultimately reducing hesitation caused by mismatches between the actual item and its image.
AI can shorten production time, but it cannot substitute for the product itself. Regardless of the tools used, images must accurately reflect the model, color, quantity, and accessories that buyers will actually receive; moreover, the main image must comply with Amazon’s guidelines and category-specific rules. This article uses PixPix’s product image sets, image generation, image‑to‑image transformations, and localized editing as examples to present a repeatable production workflow starting from real sample photographs.
Core principles: Apply AI to backgrounds, environments, compositions, and extending visual elements; keep the product’s shape, fabric, functional components, packaging details, and quantities firmly anchored to authentic reference images.
Don’t start with “creating one great image”: first map out the buyer’s seven key questions.
Before generating images, think of each image slot as a series of buyer questions. Each image should address only one critical question, avoiding repeated placement of similar angles within the same page.
The case study used in this article features a fictional brand, AsterFold, showcasing a hanging travel toiletry organizer: made of pink‑apricot water‑repellent fabric, with ivory‑white edging, brass hooks, and zipper hardware; when unfolded, it reveals a frosted zippered pocket, a transparent curved storage pouch, and a sand‑colored mesh compartment. This product does not correspond to any real brand or item—it is solely intended to illustrate the process.
Image slots | What the buyer needs to confirm | Suggested visuals |
|---|---|---|
1. Main image | “What exactly is this, and what am I buying?” | Real product—full view on a white background |
2. Closed‑up angle | “What does it look like when folded and stored?” | Another angle showing the closed state |
3. Unfolded structure | “Where are the compartments and hooks?” | Hooks, transparent pockets, and mesh bags fully unfolded |
4. Material and hardware | “Are the zippers and fabrics refined and durable?” | Edging, texture, and close-up shots of brass zippers |
5. Hotel use | “How do you access it while traveling?” | A complete unfolding scene on a bathroom hook |
6. Packing action | “How do you take it out?” | Place the closed bag into your suitcase with your hand |
7. Core selling points | “Why choose this one?” | Diagram illustrating the empty space around hanging and partitioning functions |
This framework is more reliable than “first generate seven images, then pick the prettiest one.” It directly guides you to separately create main images, product detail shots, scene illustrations, and functional diagrams in PixPix—rather than relying on a vague prompt to try to accomplish everything at once.
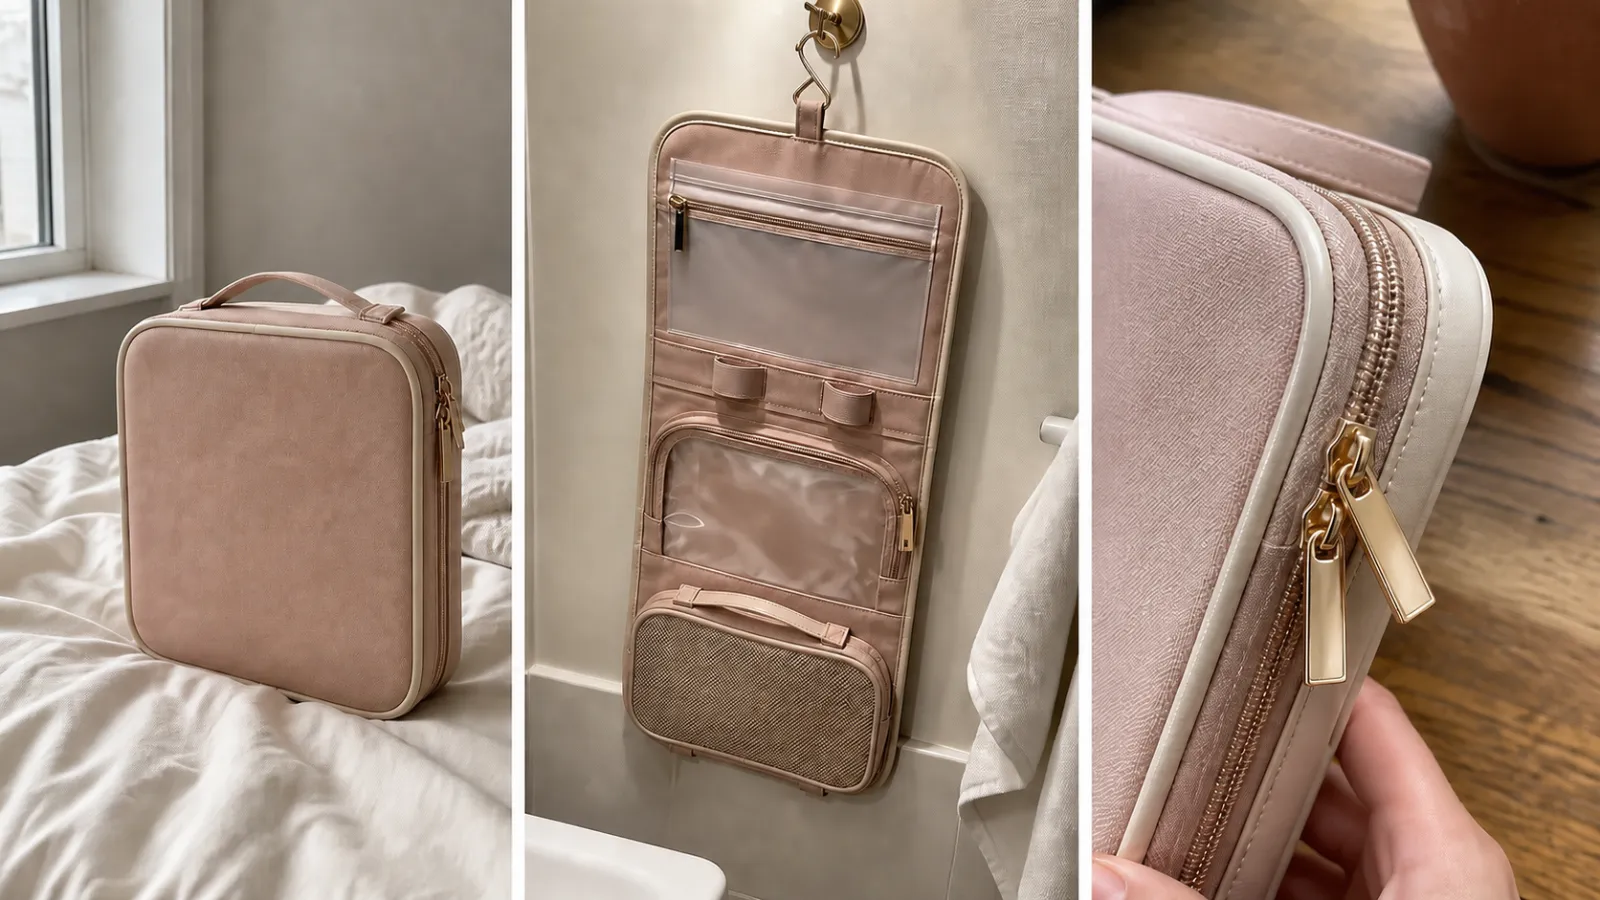
First, take three clear reference photos: these serve as anchors for the entire set of materials.
No matter how exquisite an AI-generated scene may be, any change in zipper placement, bag proportions, or fabric texture will erode consumer trust. Before you begin, prepare a small set of clear, rights‑cleared original photos for each SKU:
Full close-up photo: The product’s edges, handles, and zippers are fully visible, and the color closely matches the real item;
Full open‑up photo: All compartments—including hooks, transparent pockets, mesh bags, elastic loops, etc.—are fully captured in the frame;
Functional close-up: Parts prone to AI alteration, such as zippers, hooks, transparent materials, edge trims, and stitching.
When shooting, use diffused natural light or steady supplemental lighting, ensuring the product is fully visible within the frame. Avoid using photos obscured by hands, severely distorted by perspective, overly reflective, or excessively retouched as master images. For products featuring printed text, certification marks, complex logos, or accessory sets, it’s best to keep additional high‑resolution close‑up shots on hand for final, item‑by‑item verification.
You can organize these images into an “AsterFold Product Master Set.” Each time you generate scenes or edit backgrounds in PixPix, upload the corresponding master image as a reference—rather than simply inputting “a pink toiletry bag.” This approach greatly increases the likelihood of maintaining consistent color, proportions, and structural integrity across all variations.
Level One: First, complete a clean white‑background main image
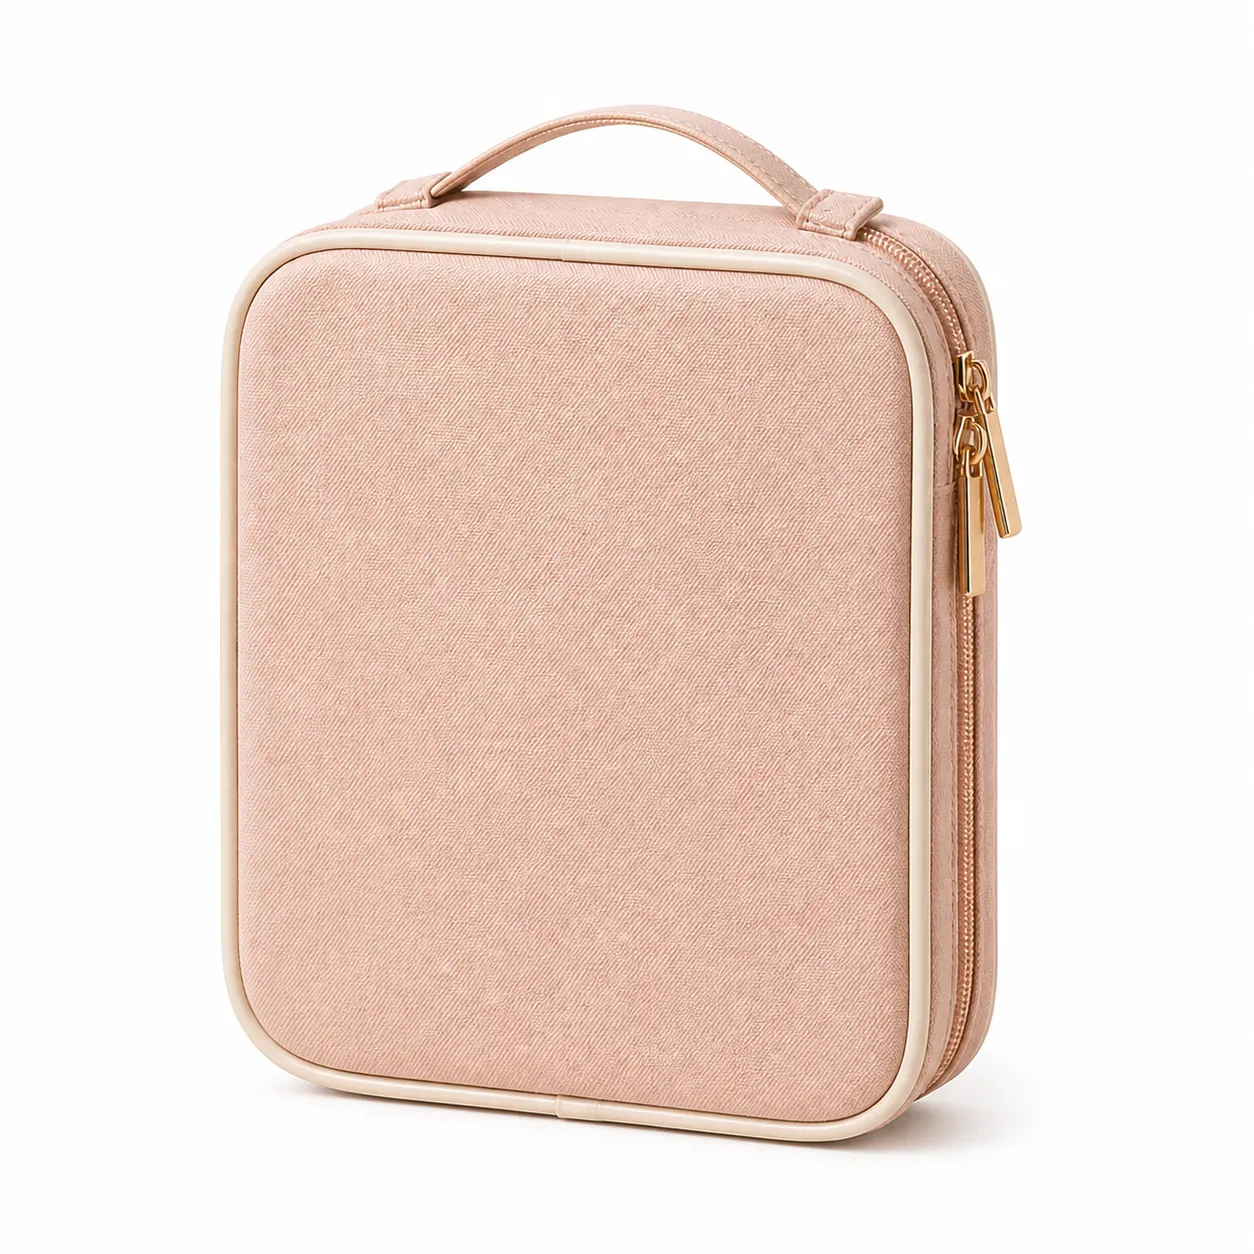
The main image isn’t an artistic creation—it exists to help buyers instantly recognize the product. At this stage, what matters most isn’t atmosphere, but accuracy, clarity, and freedom from distractions.
In PixPix, upload the clearest full‑size photo of the product. You can start by removing or replacing the background, cropping, and enhancing image quality to create a white‑background candidate. Always verify that the product itself hasn’t been altered before and after generation.
White‑background main image prompt template:
Use the uploaded real‑world product reference photo as the sole basis for the item. Preserve the product’s exact outline,
pink‑apricot water‑repellent fabric, ivory‑white edging, brass hooks and zippers, handles, matte zipper pouches,
transparent curved storage pockets, and the structure, proportions, and all visible details of the bottom mesh pocket.
Produce professional e‑commerce white‑background product photography: center the entire product, use a pure white background with RGB 255,255,255,
soft natural shadows that don’t obscure details, and ensure the product occupies roughly 85% or more of the frame.
Do not add hands, people, props, text, promotional stickers, extra accessories, borders, or watermarks.
After generation, the main image must undergo two rounds of review:
Zoomed‑in review: Check whether seams, zipper pulls, hooks, inner pockets, edges, and fabrics have been altered;
Thumbnail review: Reduce the image to the typical size used on search pages, confirming that even light‑colored products still maintain clear outlines against the white background.
If the product is very light-colored, bright, or highly reflective, be especially careful to check whether the background “appears white” but actually has a grayish, bluish tint, or noticeable reflections. If necessary, use an image-editing tool to sample and examine the background pixels rather than relying on visual judgment.
Level 2: Generate “verifiable” secondary images using the same master template
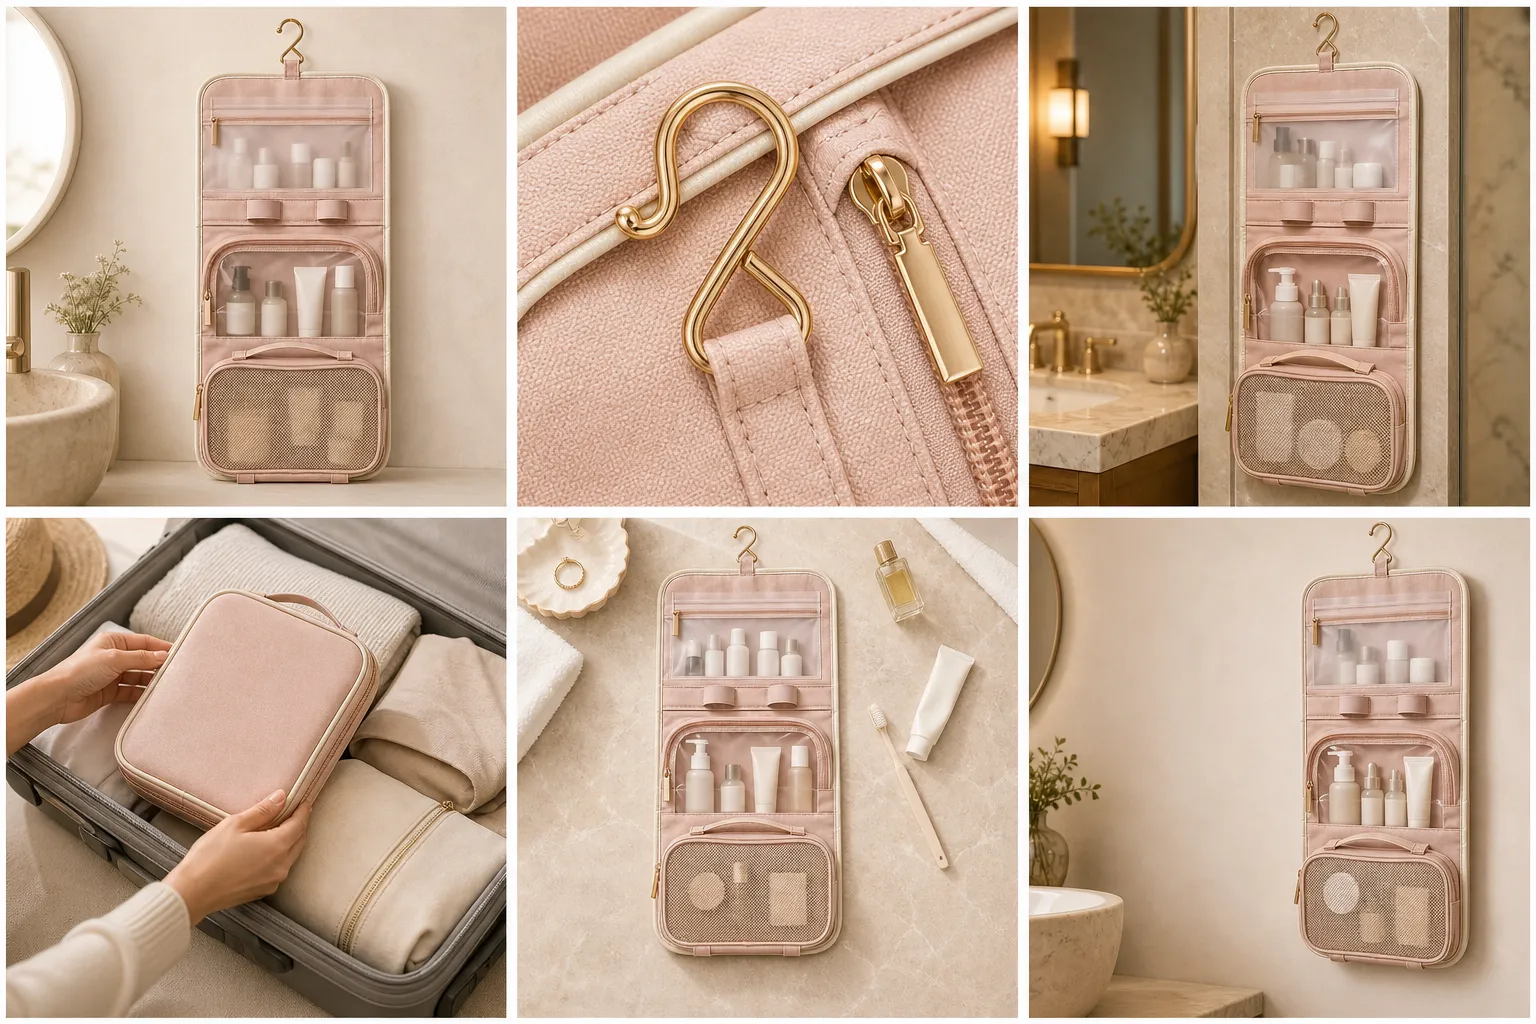
Once the main image has been approved, apply the same product master template to create secondary images. Although secondary images offer more space, this does not mean you can arbitrarily fabricate features or accessories. A practical approach is to produce secondary images categorized by “type of evidence.”
1. Structural evidence: Capture areas that buyers cannot see
For example, when creating a fully opened view of a toiletry bag from the front or at a 45-degree angle, emphasize details such as hooks, frosted pouches, transparent pockets, mesh bags, zipper tracks, and edge stitching. If the resulting image alters the number of pockets, seam lines, or zipper structure, revert to the original real-life photos and remake it—do not accept incorrect details just for aesthetic appeal.
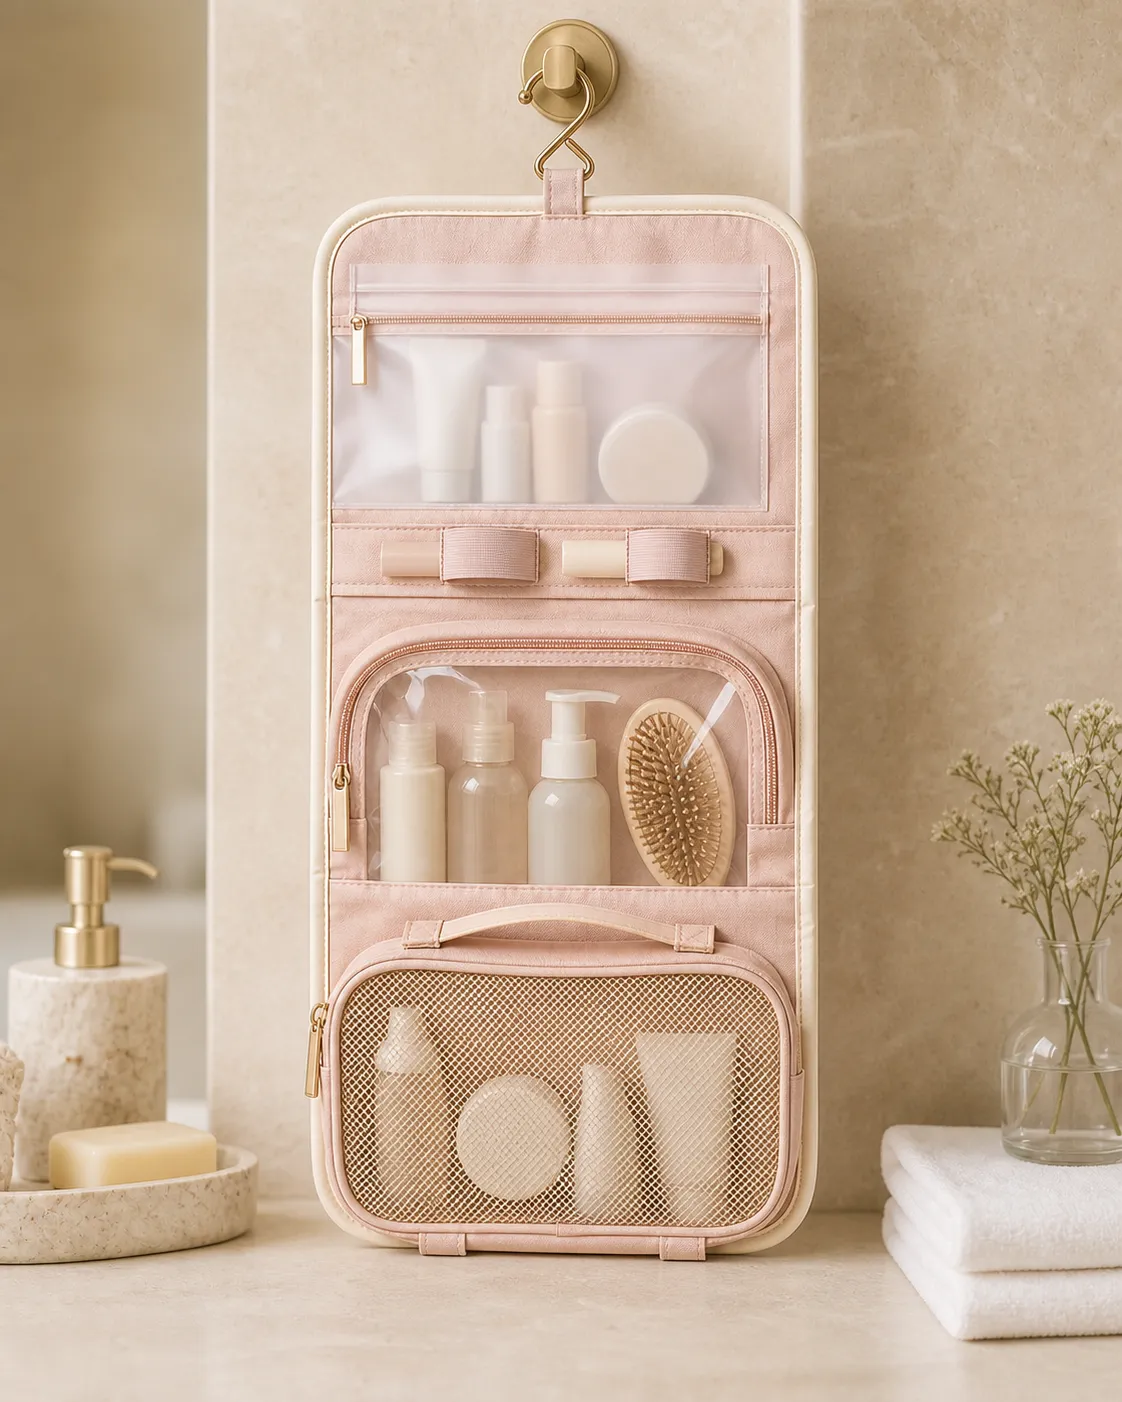
Using the same AsterFold hanging toiletry bag featured in the reference image as the main subject, maintain the powder‑apricot fabric,
ivory‑white edging, brass hooks and zippers, frosted zipper pouches, transparent curved storage bags, a bottom mesh pocket, and all proportions exactly consistent.
Show the toiletry bag suspended and fully unfolded in a close‑up frontal view, placed in a clean, light‑colored hotel bathroom setting,
with only the actual products sold with the bag and a minimal neutral background.
Natural soft lighting, clear details, no text, no logos, and no added accessories.
2. Usage evidence: Let the scene support the product’s function
A scene image should not simply “place the product in a beautiful room.” Instead, it should help buyers understand how the product is used: hanging toiletries in a hotel bathroom, packing the bag into luggage before boarding, or organizing travel-sized bottles while on the go. When including people, clearly describe hand positions and actions, and verify that contact points look natural.
Maintain the toiletry bag’s appearance, size proportions, powder‑apricot fabric, ivory‑white edging, and brass zippers as shown in the uploaded reference image.
In a bright yet restrained hotel travel setting, a pair of adult hands is placing a closed toiletry bag into a suitcase,
with the hands serving only as supporting elements for the action; the product remains the central focus. Shot from a slightly elevated near‑front perspective under soft daylight,
this is authentic e‑commerce lifestyle photography—do not alter the bag’s structure, nor add brand logos, text, or unsold accessories.
3. Selective evidence: Highlight only one genuine selling point at a time
Functional illustration images are ideal for explaining “why choose this product,” but avoid cramming all copy, icons, dimensions, freebies, and promotions onto a single image. First identify one key feature backed by physical evidence—such as “foldable storage” or “two internal compartmentalized pockets”—then leave ample clean space around the product. Finally, manually add verified text, dimension lines, and icons using your layout tools.
It is not advisable to entrust critical specifications, numbers, units, or promises entirely to image‑generation models. AI may misinterpret text, alter numerical values, or invent nonexistent markings; therefore, always cross‑check final copy and dimensions against your product specification sheet and perform manual verification before publishing.
Make the entire set of images appear unified under one brand: establish four strict rules
Secondary images can feel more lifelike, but buyers should always recognize the same product. For each SKU, list four unchangeable parameters and repeat them in every PixPix prompt:
Locked items | AsterFold example | Inspection method |
|---|---|---|
Product identification | Powder‑apricot color, ivory‑white edging, brass hardware, three types of storage compartments | Compare item by item with the master template |
Geometric proportions | Closed length, width, and height, unfolding direction, hook and zipper paths | Side-by-side comparison of outlines |
Packaging and Quantity | One single toiletry bag; no fictitious freebies or bottled items | Compare with the actual sales listing |
Visual Language | Warm ivory, light stone/neutral hotel travel setting | View the complete set of thumbnails side by side |
A useful tip is to first confirm one highly accurate product image, then use that image as a base for localized edits or scene extensions. Avoid reimagining the product for each secondary image. PixPix’s image‑to‑image generation and localized editing tools are particularly well suited for such reference‑driven extensions. For minor yet critical structural errors, replacing an entire image regeneration with targeted corrections is usually more manageable.
Double verification before uploading: authenticity and platform compliance should not be conflated.
Completion of generation does not guarantee eligibility for listing. It’s recommended to break down the review into two separate checklists: the first verifies product authenticity, while the second ensures file and main images comply with current Amazon guidelines.
A. Product Authenticity Checklist (each image must pass)
Colors, materials, shapes, and size proportions match the physical product;
The number of items shown matches the actual number sold;
No additional accessories, features, or effects are included that are not sold with the product;
Packaging, labels, and text have not been altered;
Hands of people, points of contact with the product, zippers, and opening states appear natural and believable.
B. General Amazon Main Image Standards (recheck category-specific requirements before uploading)
Checklist items | General standards |
|---|---|
Background | Main images typically require pure white RGB 255,255,255 |
Proportion of product in the frame | The product should generally occupy at least about 85% of the frame |
Presentation of the product | Complete, clear, and representing the actual item for sale; illustrations, placeholder images, or misleading props must not be used as substitutes |
Screen elements | Main images should generally avoid extra text, promotional graphics, watermarks, borders, or props not sold with the product |
Pixels | Images with a long side of 1,000 px or more can enable zooming; the minimum requirements and category restrictions should be based on Seller Central |
Files | JPEG is generally the preferred format; Amazon also accepts some other formats—please confirm current rules before uploading |
These are general image standards from Amazon’s public information and do not represent the complete rules for all categories. Categories such as apparel, footwear, furniture, baby products, and beauty may have specific requirements regarding composition, models, or backgrounds; different marketplaces may also update their guidelines. Ultimately, please refer to the Seller Central Style Guide for your specific marketplace and category. View Amazon Seller Central’s image standards documentation
What does PixPix do in this workflow?
You don’t need to generate every image from scratch. PixPix offers two complementary ways to use it within this process:
Create and refine images one by one: Use text-to-image, image-to-image, local retouching, background replacement, and image expansion techniques to iteratively polish a designated main image, scene image, or detail image. This approach is ideal for images with clear requirements regarding composition, local details, and consistency with reference materials.
Quickly create product image sets: After uploading real product photos, let “Product Image Sets” first generate candidate sets following e-commerce display logic. This tool supports Amazon, Shopify, and independent websites, covering common image types such as main images, highlight images, scene images, detail images, and specification images. It’s recommended to upload 1–3 clear, multi-angle original product photos, then select your target platform, language, and set structure. Enter PixPix Product Image Sets
For products like AsterFold, we recommend first using product image sets to quickly obtain an initial draft comprising “main image + expanded structure + hardware details + hotel hanging + packaging + blank space highlight images.” Then, choose the most accurate product image among them as the new master template, and use image-to-image generation or localized editing to refine each individual image. This approach reduces the time required to plan an entire listing from scratch while still maintaining control over critical details that might otherwise be overlooked during a single automated generation.
A more efficient and controllable workflow is:
Upload your own clear, real-life product photos to establish a master template group;
In “Product Image Sets,” upload 1–3 master templates, select your platform, language, and desired image types, and quickly generate a complete set of candidates;
Use image editing tools to first create white backgrounds, clean up backgrounds, and make localized corrections;
Extend additional angles, usage scenarios, and compositions through image-to-image generation using the same master template;
Perform magnification checks on available candidates, then use confirmed images as the basis for expanding other secondary images;
Manually review key text, dimensions, product consistency, and main image backgrounds before uploading.
Product image sets address the task of “quickly building a complete set of candidate images,” but they do not automatically verify authenticity or compliance with platform guidelines. In particular, aspects such as the main image background, number of products, accessories, specification text, and visible structures must still be checked against the actual product, sales listings, and Seller Central rules on a per-image basis. If any inconsistencies arise, return to the reference image and localized editing stages for correction rather than proceeding directly to upload.
Frequently Asked Questions
Can AI-generated images be used directly as Amazon main images?
The key issue is not whether an image was generated with AI assistance, but whether it accurately represents the physical product and meets current main image and category standards. Do not treat model-generated approximations as genuine product images; instead, base your work on actual product reference images and carefully verify background elements, product proportions, overall completeness, and visual composition item by item.
Can the images generated by the product image set tool be used directly on Amazon?
You can use PixPix’s “Product Image Set” as a quick starting point for your Amazon listing materials: after selecting Amazon, the tool organizes sets of candidate images—covering common placements such as the main image, bullet-point images, scene shots, detail shots, and specification graphics—according to the target platform, aspect ratio, and language. You can also tailor the content based on the product highlights, usage scenarios, and additional requirements you provide. View the Product Image Set Tool
However, this means the images are generated according to Amazon’s listing requirements; it does not imply that every image can be published without review. The main image still needs to be individually checked against rules regarding a plain white background, product integrity, product proportion, and the absence of text or props. All images must also verify the physical structure, actual quantity sold, brand information, and specifications. PixPix’s official process likewise recommends completing a thorough review based on the target platform’s guidelines before uploading your image set.
Can text and scenes be included in the secondary images?
Yes, they can. Bullet-point images and specification graphics within the product image set can be used to include supplementary details—for example, material descriptions, compartmentalization methods, usage scenarios, dimensions, or packaging contents—while scene images help buyers visualize real-world applications. When filling out product highlights and additional requirements, only information already confirmed through the product specification sheet and actual sales listings should be used.
It’s important to note that allows for annotations on secondary images, not the main image. Text, numbers, units, comparative conclusions, and icons in secondary images should be manually verified item by item; avoid letting the generated results arbitrarily add claims about efficacy, certifications, dimensions, or free gifts. If you’re uncertain about the specific restrictions applicable to your category, first consult the latest Style Guide in Seller Central.
Conclusion: Let AI shorten production time, rather than amplify post-sale risks.
Good Amazon product photography ultimately serves one purpose: enabling clear decision-making. Buyers should be able to see exactly what they’ll receive, how to use it, where the key details lie, and whether it meets their needs.
Start with a reliable set of real-life reference photos, then use PixPix to refine backgrounds, expand scenes, and make localized adjustments, concluding with a dual check for both authenticity and compliance. What you gain is not just faster image generation, but a repeatable visual asset workflow that can be applied consistently across every SKU.
Editorial Note: AsterFold and its products are presented as fictional examples. This article does not constitute advice on Amazon compliance, legal matters, or commercial authorization; please refer to your Seller Central account, category Style Guide, product specifications, and authorized scope before listing.

AI Image Tool Built for E-commerce Teams
For new product launches, advertising, and promotional campaigns, use AI to generate product images, scene visuals, ad creatives, and short video assets — making content production faster.